How can we help?
Setting Up SalesBot in AmoCRM
How to Set Up SalesBot?
SalesBot can be configured to perform specific actions. It allows you to automatically respond to customers in chats on:
- Vkontakte
- Telegram
- Viber
Instructions for each communication channel can be found in the settings window.
To enable the bot to reply to messages, you need to create a trigger.
How to Set Up Triggers?
To add a trigger, open the “Deals” or “Customers” section – “Configure Funnel.”
Select the stage where you want the trigger to activate, click on it, and choose “SalesBot” from the amoCRM tools.
In the auto-action settings, you can:
1. Add conditions for the presence of certain data in the deal or customer. For example, you can specify that the auto-action will trigger if the deal or customer has a specific tag and/or a specific responsible person assigned.
2. Specify the condition for executing the action:
- on an incoming call
- on an incoming email
- on an incoming chat message
- when visiting the website
- based on a key action
- upon form submission
- upon full payment of an issued invoice (invoices are issued via integrations with other services)
- when changing the responsible person
- upon creation in the stage (at the event moment, after 5 minutes, 10 minutes, 1 day, or a custom interval in days)
- upon moving to the stage (at the event moment, after 5 minutes, 10 minutes, 1 day, or a custom interval in days)
- upon moving or creation in the stage (at the event moment, after 5 minutes, 10 minutes, 1 day, or a custom interval in days)
- at a specific time
3. Choose the bot’s working hours: “Always” – the bot will operate all day every day, or you can set specific working hours for each day. To do this, select one or more days and set the bot’s working hours.
4. Messages that the bot has replied to can be left unread; to enable this, turn on the function in the trigger settings.
5. Select a bot from the list of saved bots that will operate at this stage.
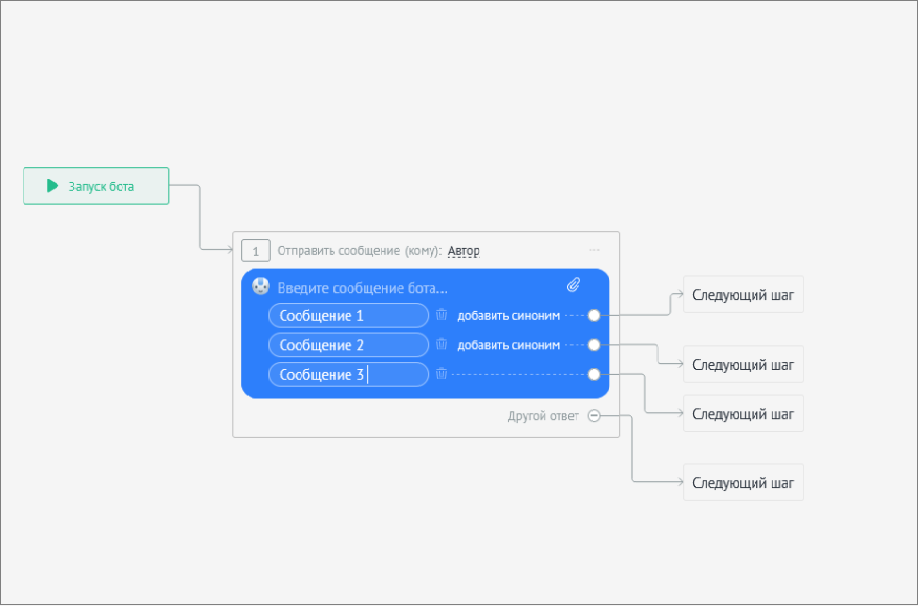
If you don’t have any saved bots, you can create one by clicking “+ Create New Bot,” which will open the editor where you can configure the bot.
After creating the trigger, select a bot from the list of saved bots that will operate at this stage. If you don’t have any saved bots, you can create one by clicking “+ Create New Bot,” which will open the editor where you can configure the bot.
The following actions are available for configuration:
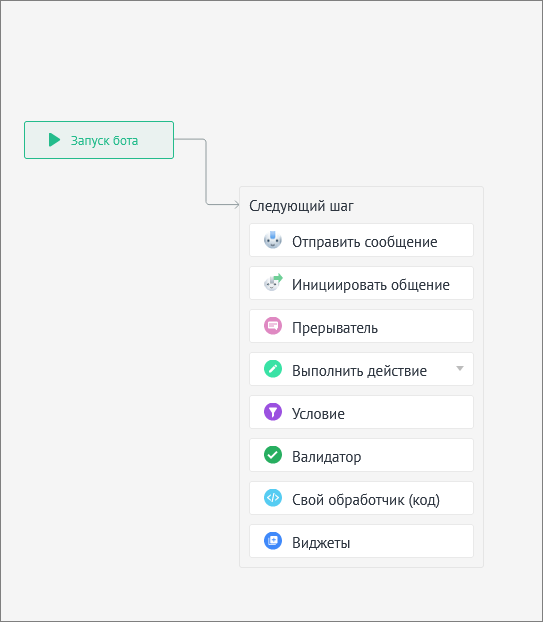
- Send a message
- Interruptor
- Perform an action
- Condition
- Validator
- Go to another step
- Custom handler (code)
- Stop the bot
When you need the bot’s next step to execute not immediately but after a certain delay, you can use the “Interruptor” and “Timer.” In the timer, you can specify the time in seconds, minutes, or hours after which the bot will perform the next action.
The “Validator” allows you to specify a range of numbers. This is useful for filtering client messages and applying additional filters in the bot’s scenario.
In the “Custom handler” section, you can enter code for the bot’s operation. Using the “Custom handler” lets you continue configuring the bot in the visual editor.
To stop the bot – in the “End action” block, you can “Close the conversation” by triggering the corresponding scenario.
You can also launch another bot. From the “Distributor” bot, you can transfer the conversation to the technical support bot or the sales department bot.
Any step can be copied, renamed, or deleted by clicking the “three dots” in the scenario step block.
If you want to write bot code, you can find more detailed information in the documentation on the AmoCRM website.
If you have any additional questions after reading this guide, you can contact AmoCRM technical support at support@amocrm.ru